说明
全部虚拟机只有两个步骤相同操作,四台虚拟机进行换源操作并关闭防火墙.实验准备中表格中的节点名称可以按照自己的需求更改,IP 地址视情况更改,Node2-3 为部署 web 站点,这里只展示一台的步骤,两台的步骤相同.
实验图
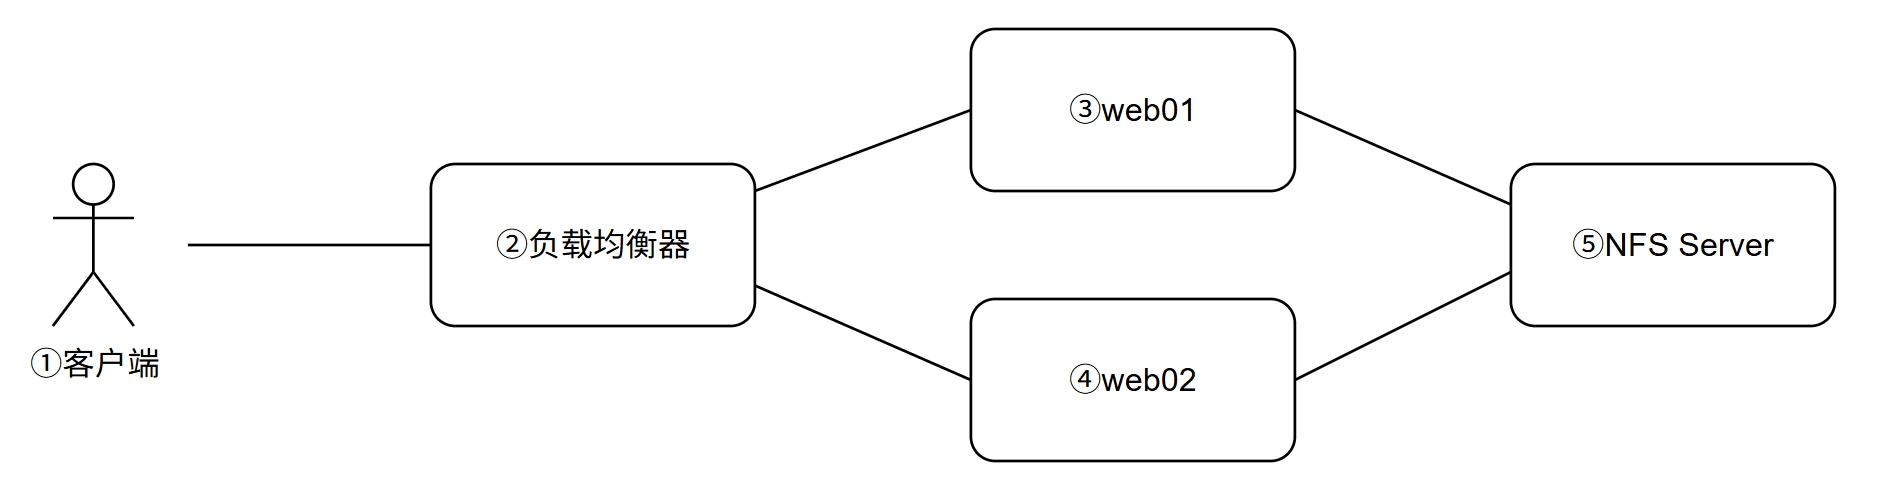
实验准备
实验需准备四台虚拟机,以下视情况进行更改.
| 节点名称 |
IP 地址 |
说明 |
| node01 |
192.168.100.134 |
负载均衡器(部署 Nginx 反向代理) |
| node02 |
192.168.100.135 |
Web 站点 1(Nginx + NFS 挂载) |
| node03 |
192.168.100.136 |
Web 站点 2(Nginx + NFS 挂载) |
| node04 |
192.168.100.137 |
NFS 服务器(提供共享存储) |
Node1-4 换源操作,并关闭防火墙
这里的操作是需要对四台虚拟机进行的操作
备份默认源
1
| sudo cp /etc/yum.repos.d/CentOS-Base.repo /etc/yum.repos.d/CentOS-Base.repo.bak
|
进行换源操作,这里使用阿里云源,需要使用其他源也可以换成别的
阿里云源
1
| sudo wget -O /etc/yum.repos.d/CentOS-Base.repo http://mirrors.aliyun.com/repo/Centos-7.repo
|
清华大学源
1
| sudo wget -O /etc/yum.repos.d/CentOS-Base.repo https://mirrors.tuna.tsinghua.edu.cn/repo/Centos-7.repo
|
网易源
1
| sudo wget -O /etc/yum.repos.d/CentOS-Base.repo http://mirrors.163.com/.help/CentOS7-Base-163.repo
|
中科大源
1
| sudo wget -O /etc/yum.repos.d/CentOS-Base.repo http://mirrors.ustc.edu.cn/centos/7/os/x86_64/
|
清理 yum 源
1
2
| sudo yum clean all
sudo yum makecache
|
验证是否有效
关闭防火墙
1
| systemctl stop firewalld.service
|
Node4 操作
安装 NFS 服务
1
| yum install -y nfs-utils rpcbind
|
创建共享目录并设置权限
创建共享目录,用于存放 Web 站点需共享的数据
1
2
3
| mkdir -p /data/nfs_share
chown -R nfsnobody:nfsnobody /data/nfs_share
chmod -R 755 /data/nfs_share
|
配置 NFS 共享规则
编辑 /etc/exports 文件,添加共享配置,允许指定网段访问共享目录
1
| echo "/data/nfs_share 192.168.100.0/24(rw,sync,no_root_squash)" >> /etc/exports
|
其中,192.168.100.0/24 表示允许该网段内节点访问,rw 为读写权限,sync 保障数据同步写入,no_root_squash 允许客户端以 root 身份访问(生产环境可按需调整为更严格权限 )
启动服务并设置开机自启
1
2
| systemctl start rpcbind nfs
systemctl enable rpcbind nfs
|
验证 NFS 服务是否生效
1
2
3
4
| showmount -e localhost
|
Node2-3 部署 Web 服务(数据同步依赖 NFS 挂载 )
安装 Nginx 所需要的环境
由于 CentOS7 没办法使用命令方式直接安装,只能使用编译安装,所以这里使用的是编译安装,其他相同或版本默认安装路径不同,如果使用包管理器安装 Nginx 路径为:/usr/share/nginx/,使用编译安装的路径为:/usr/local/nginx
1
2
3
4
5
6
7
8
9
|
yum install gcc-c++
yum install -y pcre pcre-devel
yum install -y zlib zlib-devel
yum install -y openssl openssl-devel
|
安装 Nginx
这里使用的是编译安装,需要先在官网下载包到本地解压进行编译安装
1
2
3
4
5
6
|
cd usr/local
mkdir nginx
cd nginx
|
通过 wget 下载 nginx 安装包
1
| wget https://nginx.org/download/nginx-1.22.1.tar.gz
|
解压并加入目录
1
2
| tar -zxvf nginx-1.22.1.tar.gz
cd nginx-1.22.1
|
配置
1
| ./configure --prefix=/usr/local/nginx --with-http_stub_status_module --with-http_ssl_module
|
编译安装
启动 nginx 服务,附关闭命令
1
2
3
4
5
6
7
8
9
10
11
|
cd /usr/local/nginx/sbin
./nginx
cd /usr/local/nginx/sbin
./nginx -s stop
|
配置 nginx 配置环境变量
1
2
3
4
| vim /etc/profile
export PATH=$PATH:/usr/local/nginx/sbin
|
定位到服务目录下并使配置生效
1
2
| cd /usr/local/nginx/sbin
source /etc/profile
|
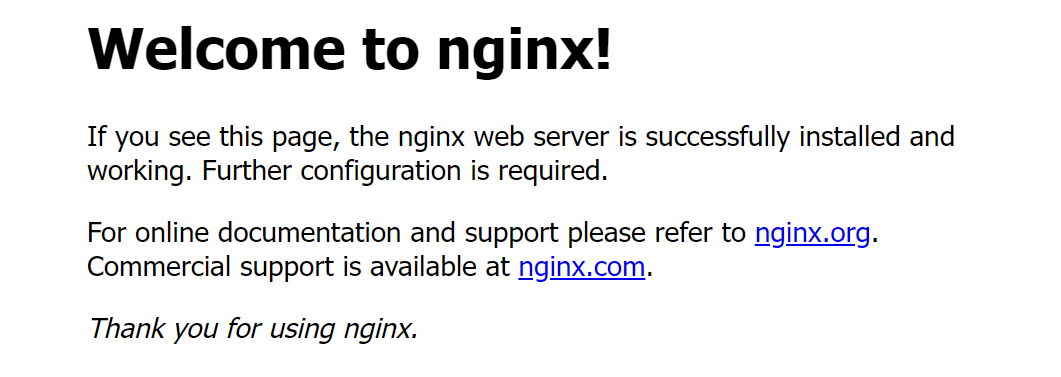
浏览器输入 Node4 服务器 ip 出现如下画面为成功
Node2-3 部署 Web 站点
挂载 NFS 共享目录
1
2
3
4
5
6
7
8
9
|
yum install -y nfs-utils
mount -t nfs 192.168.100.137:/data/nfs_share /usr/share/nginx/html
echo "192.168.100.137:/data/nfs_share /usr/share/nginx/html nfs defaults 0 0" >> /etc/fstab
mount -a
|
启动 Nginx 并设置开机自启
1
2
| systemctl start nginx
systemctl enable nginx
|
验证数据同步
在 NFS 服务端(node04 节点 )的共享目录创建测试文件
1
| echo "Hello from NFS Share!" > /data/nfs_share/index.html
|
在 node02、node03 节点,通过 curl 命令访问本地 Nginx 服务,验证数据是否同步
Node1 部署负载均衡(采用 Nginx 反向代理 )
安装 Nginx,这里安装 Nginx 同上面的 Node2-3 操作相同故不演示
配置负载均衡规则
编辑 /usr/local/nginx/conf.d/loadbalance.conf 文件(若无则新建 ),添加负载均衡配置
1
2
3
4
5
6
7
8
9
10
11
12
13
14
15
16
| upstream web_servers {
server 192.168.100.135;
server 192.168.100.136;
}
server {
listen 80;
server_name localhost;
location / {
proxy_pass http://web_servers;
proxy_set_header Host $host;
proxy_set_header X-Real-IP $remote_addr;
}
}
|
重启 Nginx
1
| /usr/local/nginx/sbin/nginx -s reload
|
启动 Nginx 并验证
1
2
3
4
| systemctl start nginx
systemctl enable nginx
nginx -t
|
测试负载均衡功能,在 node01 节点或客户端执行 curl 命令
系统可用性测试
客户端访问测试
在同网段的客户端(如本地电脑浏览器、其他虚拟机 ),访问负载均衡器(node01 )的 IP 地址
预期显示 Hello from NFS Share!(与 Web 节点内容一致 )。多次刷新页面,可验证负载均衡是否按策略(默认轮询 )转发请求,也可查看 Nginx 访问日志确认:
1
| cat /var/log/nginx/access.log
|